Connect to a relay chain
This guide steps through how to connect a parachain to a relay chain.
This guide illustrates:
- How to obtain a
ParaID - How to register a parachain
- How to obtain a parachain slot
Launching a parachain requires a series of steps to ensure that the relay chain knows exactly what the parachain's runtime logic is once a slot on the relay chain is secured.
In order to achieve this, you will need to have previously successfully generated a ParaID, genesis state and Wasm runtime blob.
After successfully registering your parachain, you will be able to obtain a parachain slot (in testing though sudo, and in production via auctions and crowdloans) and start producing blocks.
The Prepare a local parachain testnet is the best place to start if you are new to parachain development. This guide is a quick reference and leaves out important details to consider when performing these steps.
Reserve a ParaID
First, you need a ParaID to perform any operation referencing your parachain/parathread for a specific relay chain.
For example, for providing the Wasm blob or genesis state, creating channels to other parachains for XCM, starting a crowdloan, etc.
- Navigate to the
Network->Parachainssection in the apps UI. If running a node with ws on port 9944, this will be: https://polkadot.js.org/apps/?rpc=ws%3A%2F%2F127.0.0.1%3A9944#/parachains/parathreads

- Go to the
Parathreadtab and click on+ParaID(a parachain always begins as a parathread with aParaID) - Reserve the
ParaID. This operation requires a deposit that is relay chain specific.
Make note of your ParaID and registering account.
The ParaID is unique to the relay chain you are connecting to, along with the account that reserved it.
This identifier is required in the following steps, and cannot generally be reused between different relay chains.
In the next steps it is assumed you use Cumulus, and thus have the proper commands for the parachain-collator binary that is produced for your collator nodes.
Customize parachain specification
Your parachain must configure the correct ParaID in your chain specification.
See the how-to guide on configuring a custom chain spec for more in-depth instructions to generate a plain spec, modify it, and generate a raw spec.
We first generate a plain spec with:
# Assumes that `rococo-local` is in `node/chan_spec.rs` as the relay you registered with
./target/release/parachain-collator build-spec --disable-default-bootnode > rococo-local-parachain-plain.json
Default ParaID is 1000 from Cumulus, so you must correctly set it for your parachain based on the reserved ParaID from above.
Assuming your reserved ParaID is 2000, you will open rococo-local-parachain-plain.json and modify two fields:
  // --snip--
  "para_id": <your `ParaID`> , // <--- = your already registered ID
  // --snip--
      "parachainInfo": {
        "parachainId": <your `ParaID`> // <--- = your already registered ID
      },
  // --snip--
Then generate a raw chain spec derived from your modified plain chain spec:
./target/release/parachain-collator build-spec --chain parachain-plain.json --raw --disable-default-bootnode > parachain-raw.jsonSave and distribute your raw spec
If you intend to let others connect to your network, they must have the associated chain spec for your network generated once and distributed to your peers. They cannot reliably produce this themselves, and need to acquire it from a single source. This stems from the non-deterministic issue in the way Wasm runtimes are compiled.
Chain specs conventionally live in a /chain-specs folder that is published in your node's codebase for others to use.
For example:
- Polkadot includes these relay chain chain specs
under
node/service/chain-specs - Cumulus includes these parachain chain specs
under
chain-specs
It is good practice to commit this raw chain spec into your source before proceeding.
Obtain Wasm runtime validation function
The relay chain also needs the parachain-specific runtime validation logic to validate parachain blocks. The parachain collator node also has a command to produce this Wasm blob:
./target/release/parachain-collator export-genesis-wasm --chain parachain-raw.json > para-wasmGenerate a parachain genesis state
To register a parachain, the relay chain needs to know the parachain's genesis state. The collator node can export that state to a file. Go to your Parachain Template folder, the following command will create a file containing the parachain's entire genesis state, hex-encoded:
./target/release/parachain-collator export-genesis-state --chain parachain-raw.json > para-genesisStart the collators
Note that we need to supply the same relay chain spec as our target relay chain!
Replace that with the proper file after the -- separator in a command similar to:
parachain-collator \
--alice \
--collator \
--force-authoring \
--chain parachain-raw.json \
--base-path /tmp/parachain/alice \
--port 40333 \
--ws-port 8844 \
-- \
--execution wasm \
--chain <relay chain spec json> \
--port 30343 \
--ws-port 9977
You should see your collator running and peering with the already running relay chain nodes. It has not start authoring parachain blocks yet. Authoring will begin when the collator is actually registered on the relay chain.
Parachain registration
Depending on your target relay chain and authority there, you have options to register.
Typically for testing you will use sudo and for production use parachain auctions and crowdloans.
This guide presently only covers the sudo testing case.
Registration deposit calculation
Optionally, you can calculate the exact formulas for deposit calculation for Polkadot runtimes in the function:
pub const fn deposit(items: u32, bytes: u32) -> Balance {}This is located in the runtime/<RELAY CHAIN>/src/constants.rs files in Polkadot.
Register Using sudo
We have our relay chain launched and our parachain collator ready to go. Now we have to register the parachain on the relay chain.
In the a production network, this will typically be accomplished with on Polkadot and Kusama, but for this tutorial we will do it with sudo call.
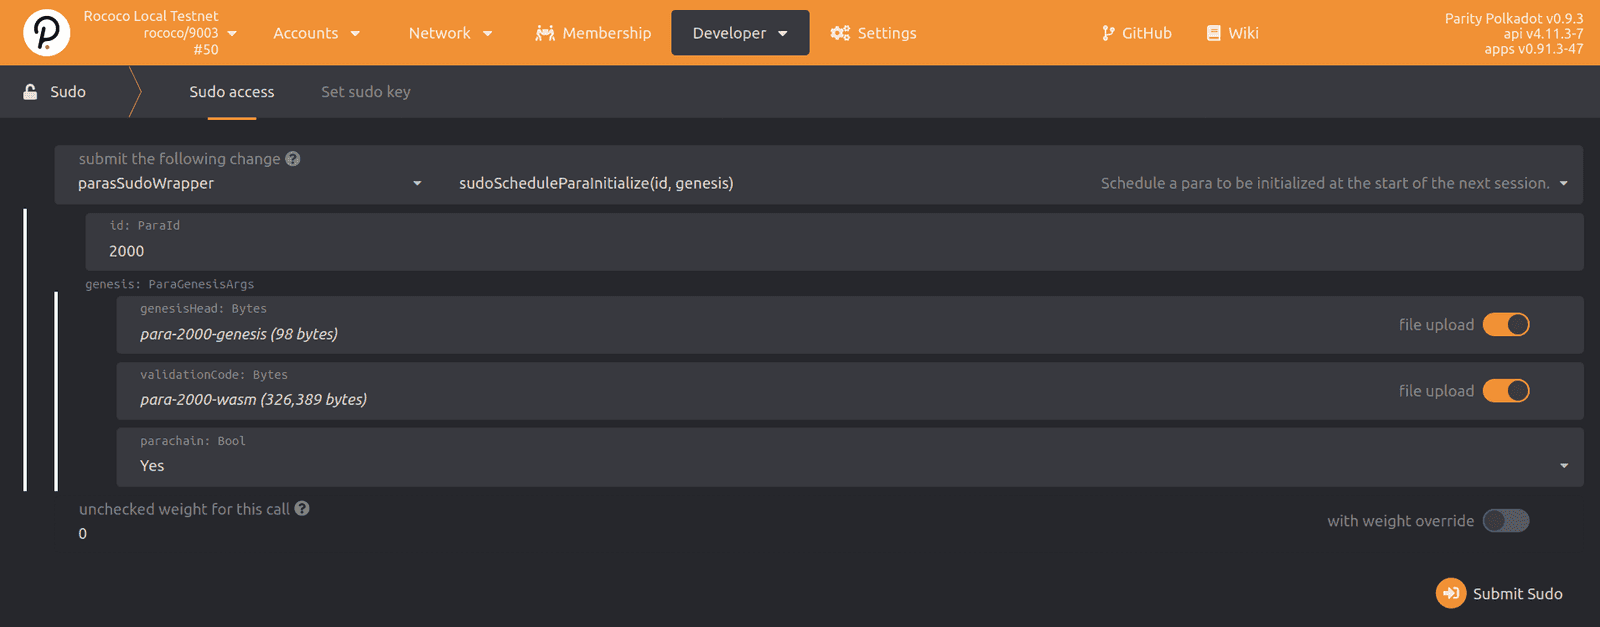
Option 1: paraSudoWrapper.sudoScheduleParaInitialize
- Go to the Polkadot Apps UI, connecting to your relay chain.
- Execute a sudo extrinsic on the relay chain by going to
Developer->sudopage. - Pick
paraSudoWrapper->sudoScheduleParaInitialize(id, genesis)as the extrinsic type, shown below.

- In the extrinsics parameters, specify the correct
ParaIDand files to use.
This dispatch, if successful, will emit the sudo.Sudid event, viewable in the relay chain explorer page.
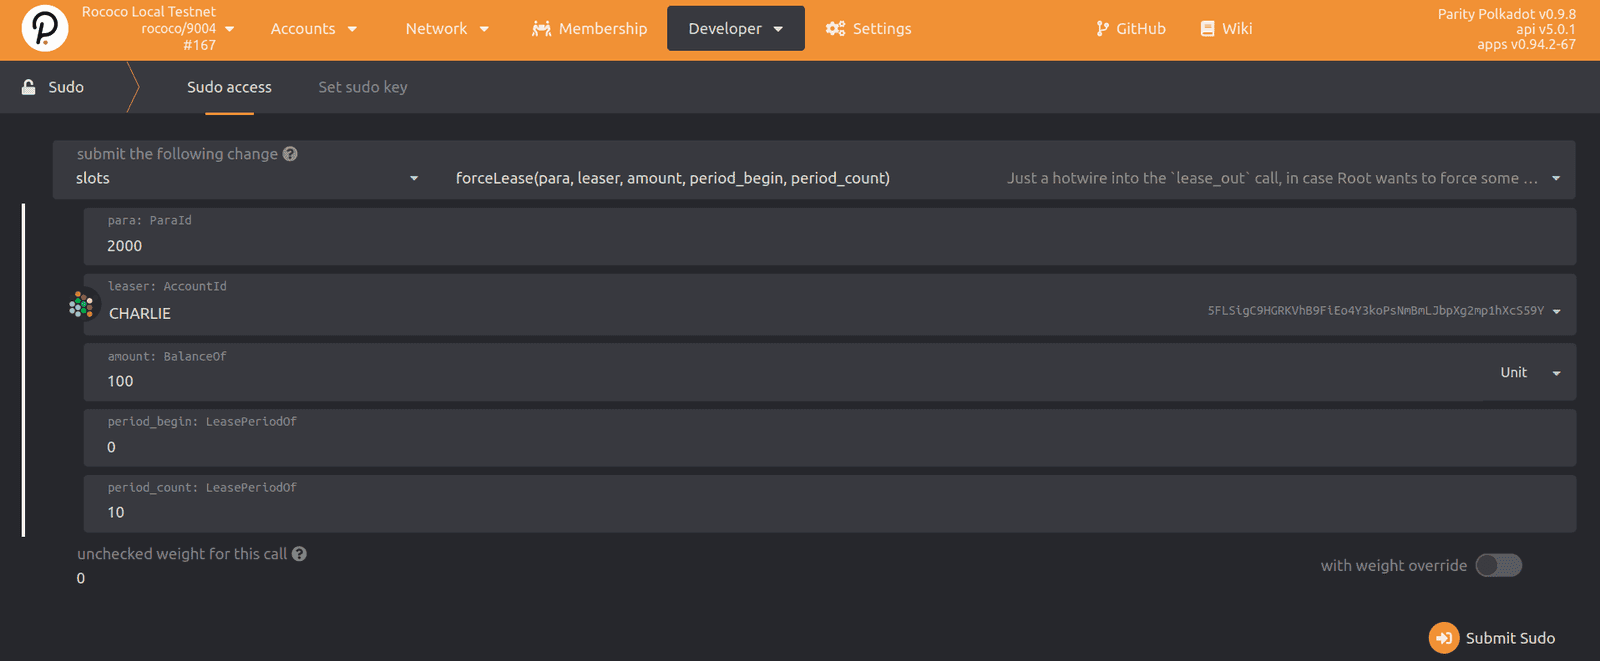
Option 2: slots.forceLease
- Go to the Polkadot Apps UI, connecting to your relay chain.
- Execute a sudo extrinsic on the relay chain by going to
Developer->sudopage. - Pick
slots->forceLease(para, leaser, amount, period_begin, period_end)as the extrinsic type, shown below.

Be sure to set the period_begin to the slot you want to start with.
For example, if you started from scratch in a test environment, the begin period is likely is to be the already active slot 0.
In general, you should set the period_end to extend beyond the time you have set aside for testing the parachain.
However, if you want to test onboarding and offboarding cycles, you should select slot leases that have gaps for a ParaID.
After fully onboarded and after block production starts you should see:

Block production and finalization
The collator should start producing parachain blocks (aka collating) once the registration is successful and a new relay chain epoch has begun!
This may take a while! Be patient as you wait for a new epoch to begin.
You can keep track of what parachains are registered and what their latest head data is on the Network > Parachains tab in the Apps UI.

Examples
- Prepare a local parachain testnet tutorial
